Image Compress: Quality or Target Size, JPG, PNG, WebP
Image Compress re-encodes a batch of JPG, PNG and WebP files (plus anything else the browser can decode, such as GIF, BMP and HEIC) into smaller files inside the browser: encode once at a fixed quality, or give the tool a target size in KB and let it iterate towards that, and cap the longest edge while you are at it. Images are never uploaded.
Image Compress re-encodes a batch of JPG, PNG and WebP files (plus anything else the browser can decode, such as GIF, BMP and HEIC) into smaller files inside the browser: encode once at a fixed quality, or give the tool a target size in KB and let it iterate towards that, and cap the longest edge while you are at it. Images are never uploaded.
It exists for the everyday case where a file is just over a limit: a form that only accepts photos under 500 KB, an email attachment that bounces, web images that slow a page down, a phone gallery of several thousand 3–5 MB originals to archive. When the run finishes you get before-and-after totals, a per-image comparison preview and a zip download.
It is not magic. For lossy formats (JPEG, WebP), “compression” means discarding detail the eye barely notices; for a lossless format (PNG) it can do almost nothing, and shrinking the pixel dimensions is the only real lever. Once that is clear, every switch makes sense — the How it works section below goes through the mechanics, and other image tools on this site link back here whenever format and file size come up.
How to use
01Add imagesdrag them in, pick them or paste them; multiple selection is supported. HEIC is converted to JPEG automatically before it joins the list, and each row shows its pixel dimensions and file size.
02Choose a compression mode“Quality first” sets the encoding quality with a slider (0.1–1, 0.75 by default) and encodes each image once; “Target size” takes a number of KB (500 by default) and repeatedly shrinks the edges and lowers the quality until the file fits.
03Optional: cap the longest edgeturn the switch on and enter a pixel value (1920 by default) — anything larger is scaled down proportionally before encoding, which is usually the single most effective step for photos.
04Click “Start compressing”the progress bar shows the file being processed. Work happens on the main thread, so the page can stutter briefly with dozens of large images.
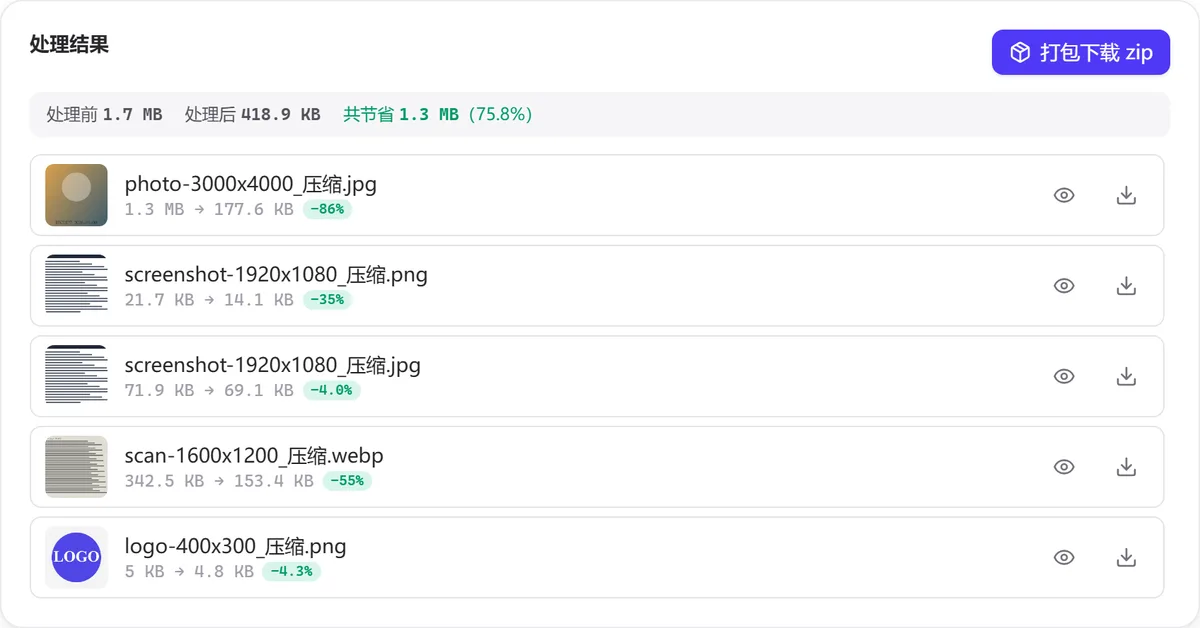
05Check the resultsthe result card shows the total before and after and the percentage saved, and each row is labelled with original size → new size plus a percentage; the eye icon toggles between “compressed” and “original”; download files one by one or “Download all as zip”.
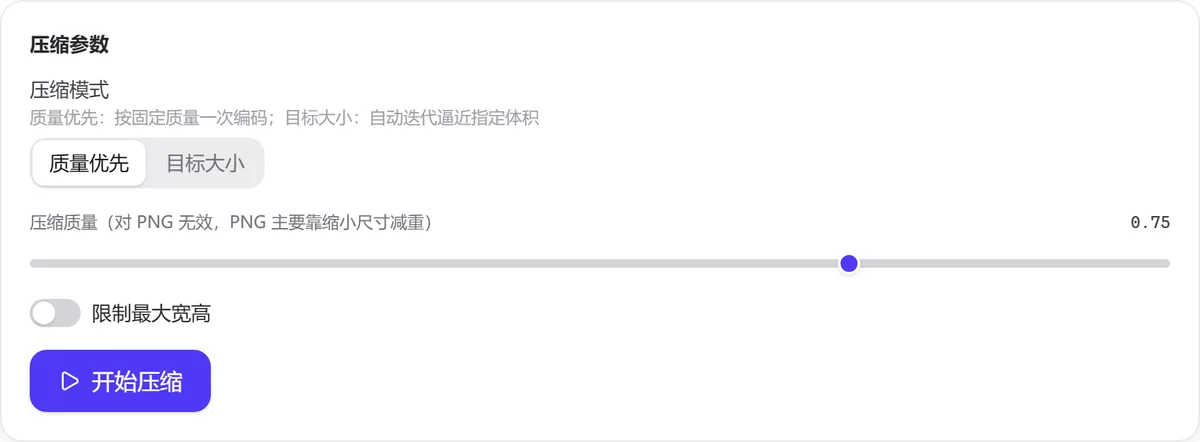
The parameter area in quality-first mode. The slider label itself warns that PNG ignores this setting.
Input and output examples
Five different kinds of image through four settings of the same run, all measured:
Drag the quality slider to see the size and a magnified detail of the same 3000 × 4000 photo (measured): 1.0 and 0.9 both give 1.2 MB (a quality above the original's is stepped down automatically until the output is just under the original), 0.75 → 1.1 MB, 0.5 → 294 KB, 0.3 → 117 KB, 0.1 → 81 KB; below 0.5 blocking and ringing start to appear at the edges.
“Target 200 KB” brings the photo down to 178 KB, yet it barely touches a 72 KB JPG that is already below the target. Some patterns are worth noting: PNG keeps the same size under all four settings, because the quality slider does nothing for it; and scaling the photo from 3000 × 4000 to a 1920 long edge leaves it at 7% of the original, far more effective than dropping the quality from 0.75 to 0.5.
The result card for the “Target 200 KB” column. The green label is the share saved, and the GIF came out as PNG.
How it works
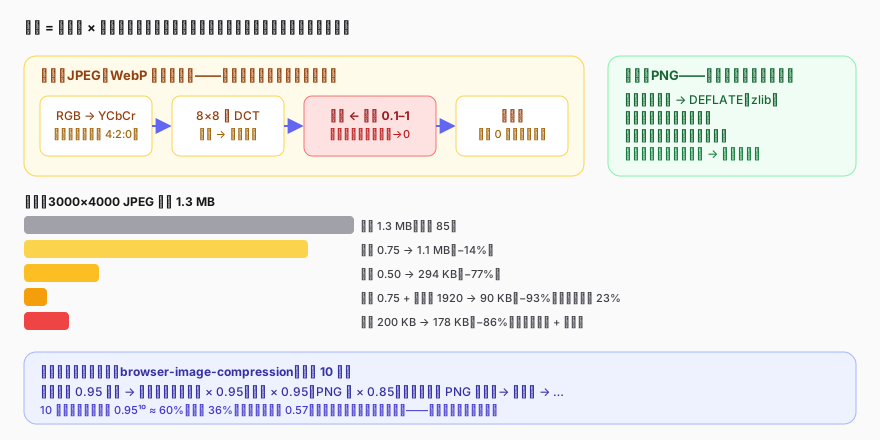
Size = pixel count × bits per pixel. Lossy formats lower the bits through quantisation; a lossless format can only use fewer pixels.
Where the size comes from
An uncompressed image takes 3 bytes per pixel, so 3000 × 4000 is 36 MB. Every image format is doing the same job: describing those pixels with fewer bits. There are only two routes — lossless (bit-for-bit identical after decoding) and lossy (throwing away information the eye barely registers in exchange for a large drop in size).
What JPEG “quality” actually controls
JPEG first converts RGB into a luminance channel plus two chroma channels, and the chroma is usually subsampled to a quarter of the resolution. The picture is then cut into 8 × 8 blocks for a discrete cosine transform (DCT), giving 64 frequency coefficients, and then comes the crucial step: quantisation, where each coefficient is divided by the matching number in a quantisation table and rounded. The quality parameter (0.1–1 here, encoder values 10–100) decides how coarse that table is: lower quality means larger divisors, so most high-frequency coefficients collapse to zero and the entropy coder squeezes that long run of zeros into almost nothing.
That is why quality is not linear: going from 0.75 to 0.5 takes the photo above from 1.1 MB to 294 KB because high-frequency detail is wiped out over that range, while going from 0.9 to 1.0 doubles the size for a difference the eye can hardly see. For most photos 0.7–0.8 is the balance point between looks and size, and content like text screenshots is more sensitive to JPEG ringing, so PNG is the better choice there.
Lossy WebP works the same way (prediction + transform + quantisation) and is usually 25%–35% smaller than JPEG at a comparable look; this tool keeps WebP in and WebP out, with the quality slider equally effective.
Why PNG ignores the quality parameter
PNG is lossless: each row of pixels is prediction-filtered and then compressed with DEFLATE (the same algorithm as zip). There is no “how much to throw away” knob — the specification has no quality parameter at all, and browser canvas encoders ignore one. Two things follow. First, PNG compresses large flat areas, text and lines extremely well (the 1920 × 1080 screenshot above is only 14 KB) and photos and noise hardly at all. Second, the only ways to make a PNG smaller are to reduce the pixel dimensions or to switch to a lossy format (use “Image Converter”).
Incidentally, the PNG going from 21.7 KB to 14.1 KB above is not lossy: the browser's PNG encoder simply picked better filters and a better compression level than the tool that produced the original.
The browser does the encoding
This tool — and every other image tool on this site — re-encodes through the browser canvas: decode → draw to canvas → canvas.toBlob(type, quality). Three consequences follow. First, the encoder comes from the browser, so the same parameter can produce a file one or two tenths different in Chrome, Safari and Firefox. Second, a canvas is a pixel array with no metadata attached: EXIF (shooting parameters, GPS) and colour profiles never reach the output, and the orientation tag is applied to the pixels and then discarded, so a portrait shot does not end up sideways. Third, JPEG has no alpha channel, so transparent areas are filled with white.
How “target size” converges
Target mode starts encoding at quality 0.95; if the result is over the target it multiplies width and height by 0.95 and the quality by 0.95 and encodes again, up to 10 rounds. After 10 rounds the longest edge can be down to 60% (36% of the pixels) with a quality floor around 0.57; if it is still over, the last round is delivered — which is why the interface says it “gets as close as it can”. For high-resolution photos, shrinking the edges contributes more than lowering quality, so photos from target mode often end up smaller and sharper than “quality 0.5”.
What happens when the quality is set above the original
If the first encode comes out larger than the original file, the library multiplies the quality by 0.95 and tries again, up to 10 rounds, until the output is below the original — which is why the photo above lands on 1.2 MB with the slider at both 1.0 and 0.9. If it is still not smaller after 10 rounds, the tool keeps the original file and marks it “Original is already small enough, kept as is”, which is common with a well-optimised PNG.
Advanced options
Shrink the edges before arguing about quality: phone originals are often 4000 px and up, while a screen shows about 2000 px at most. Turning on “Cap the longest edge at 1920” usually saves far more than any quality tweak and avoids JPEG block artefacts altogether.
Hit a form's upload limit: when a platform demands “no more than 500 KB”, use target-size mode with 500 in it; if the image is high-resolution and 10 rounds still miss, run it again with a longest-edge cap as well.
Make a PNG screenshot smaller: try this tool first (a fresh encoder pass sometimes saves 20%–30%) and if that is not enough convert it to WebP or JPEG with “Image Converter”, remembering that JPEG puts ringing around text edges.
Strip GPS along the way: re-encoding drops EXIF as a matter of course, so one pass through this tool before publishing removes location data; if the goal is only to remove metadata without changing the picture, use “EXIF Viewer and Remover”.
Drag HEIC straight in: it is decoded locally to JPEG (quality 0.92) and then compressed, so no separate conversion is needed.
Scope and limitations
Input
JPG / JPEG, PNG, WebP, GIF, BMP, AVIF, HEIC / HEIF; decoding depends on the browser (AVIF needs browser support) and HEIC is turned into JPEG by a local decoder.
Output format
JPEG → JPEG, PNG → PNG, WebP → WebP; GIF / BMP / AVIF become PNG; HEIC becomes JPEG. The file name gains a _compressed suffix.
Quality
0.1–1 in steps of 0.05; no effect on PNG.
Target size
any positive integer number of KB; up to 10 iterations, so it gets close rather than guaranteeing a result.
Longest edge
any pixel value when enabled (≥ 16); it only shrinks, never enlarges.
Metadata
EXIF, GPS, colour profiles and orientation tags are all dropped (orientation is already applied to the pixels).
Transparency
kept for PNG / WebP; filled with white when the output is JPEG.
Animation
only the first frame of a GIF is kept.
Processing
serial on the main thread, deliberately not using a Web Worker so that no external script is loaded; the interface can freeze briefly on large batches.
What it does not do
lossless JPEG recompression (mozjpeg-style optimisation), PNG palette quantisation (lossy colour reduction), format changes (use “Image Converter”), or exact pixel dimensions in a batch (use “Resize Images”).
Common pitfalls
“Lower quality makes a PNG smaller”: PNG has no quality parameter and the slider does nothing. Shrink the dimensions or change the format instead.
“Compressing again will shave off more”: every JPEG re-encode adds another round of quantisation loss while barely reducing the size. Do it once and keep the original.
“The target size is guaranteed”: there are at most 10 iterations, and an extremely high-resolution image or a very small target may still overshoot; run it again with a longest-edge cap.
“Compression keeps the shooting information”: it does not. EXIF and GPS are dropped entirely — good for privacy, but not for a photographic archive that needs the parameters.
“Quality 1.0 means lossless”: it does not. JPEG at 1.0 still has chroma subsampling and rounding error, just very small ones; and the file is about twice the size of 0.9.
Typical use cases
A sign-up form that only takes photos under 500 KB
Phone-shot application material comes in at 3–4 MB a piece. Choose “Target size” and enter 500, or simply turn on “Cap the longest edge at 1920” with quality 0.75, then check the size on each result card a few seconds later.
Sixty product images for a shop update
Drop the batch in, set a 1600 longest edge and quality 0.8 in one pass, and send the zip to whoever runs the shop; if the white-background PNGs are still too big, convert them to WebP with “Image Converter”.
Publishing screenshots on a blog
Run PNG screenshots through this tool first (often 20%–40% smaller, losslessly) so text edges stay crisp; do not convert them to JPEG.
Archiving old phone photos
Several thousand originals can take tens of GB. A 2560 longest edge and quality 0.8 bring that down to about a tenth — but EXIF is lost, so save the originals separately if you need the capture times.
FAQ
Why did the PNG hardly change?
PNG is lossless and has no adjustable quality. This tool can only re-encode it once through the browser's encoder, and the gain depends on how well the original was optimised. To shrink it noticeably, reduce the dimensions or convert it to WebP / JPEG.
Why is the result bigger than the original, marked “kept as is”?
The original was already well compressed, or the quality you chose is above the quality it was encoded at. In that case the tool keeps the original file unchanged.
I set a target of 200 KB and got 210 KB?
There are at most 10 iterations, and a very high-resolution image may not reach the target within them. Turn on “Cap the longest edge” and run it again, or set the target slightly below the limit.
Can compression rotate my photo the wrong way?
No. The orientation tag is applied to the pixels before encoding, so the output has the same orientation in any viewer; the tag itself is removed along with the rest of the EXIF.
Does it support HEIC, and how many files can I add?
Yes — HEIC is decoded to JPEG locally and then compressed, with no network involved. There is no limit on the number, only on browser memory: dozens of 4000 px photos are fine, while several hundred are better done in batches.
Privacy
Decoding, scaling and encoding all happen inside your browser; images are never uploaded and the tool works offline. The output carries no EXIF or GPS data. Read more in the privacy policy.
References & further reading
ITU-T Recommendation T.81 (1992), Digital compression and coding of continuous-tone still images — the DCT, quantisation tables and entropy coding behind JPEG: https://www.w3.org/Graphics/JPEG/itu-t81.pdf(访问日期:2026-09-09)