PDF Compress: Rasterised Pages, 3 DPI and JPEG Presets
PDF Compress renders every page of a file to a bitmap in the browser, re-encodes it as JPEG at the sharpness you pick, and stitches those JPEGs back into a new PDF with unchanged page dimensions — nothing is uploaded, and the result is usually a fraction of the original, sometimes a few dozen times smaller.
PDF Compress renders every page of a file to a bitmap in the browser, re-encodes it as JPEG at the sharpness you pick, and stitches those JPEGs back into a new PDF with unchanged page dimensions — nothing is uploaded, and the result is usually a fraction of the original, sometimes a few dozen times smaller.
Its best subjects are scans and image-heavy files: PDFs produced by a phone scanning app, contracts straight out of a copier, receipts photographed with a camera. Every page in these is already one large image, and re-encoding it at a sensible resolution and quality often cuts the size by more than 70% with no visible change on screen.
It is not suited to files that are mostly text and already small. Rasterising whole pages turns a few KB of vector text into a one-to-two-hundred-KB image, so the file does not shrink at all — it grows, and it loses the ability to select, search and copy text. The yellow note in the tool panel says as much, and the section on how it works below explains why.
The three presets map to three fixed parameter sets: Screen (72 DPI, JPEG quality 0.55), Balanced (110 DPI, 0.70, the default) and Print (150 DPI, 0.82). Decide what the file is for before compressing — WeChat means Screen, archiving with printing in mind means Balanced or Print — and you save the time of trying one preset after another.
How to use
01Add a PDF— drop one in or click to choose. The list on the left shows the page count and the original size; an encrypted file needs its password removed in “PDF Unlock” first.
02Optional: tidy the pages— delete blank pages and turn upside-down ones the right way up in the middle area. Compression outputs the tidied arrangement, and deleted pages no longer take up space.
03Switch to the “Compress” panel and pick a preset— a line of small print under the panel states the DPI and the intended use of the current preset; “Original size” is shown there too for comparison.
04Click “Start compression”— the progress bar at the bottom advances page by page; each page has to be rendered before it is encoded, so a long document takes seconds to tens of seconds.
05Check the result— the file name carries the saving, for example scan_compressed_87%_smaller.pdf; if the output is bigger than the original the name carries no “smaller” tag, which is the tool telling you this file was not a candidate for rasterising. The result card offers “Download again” or “Add to workspace” to keep working.
Input and output examples
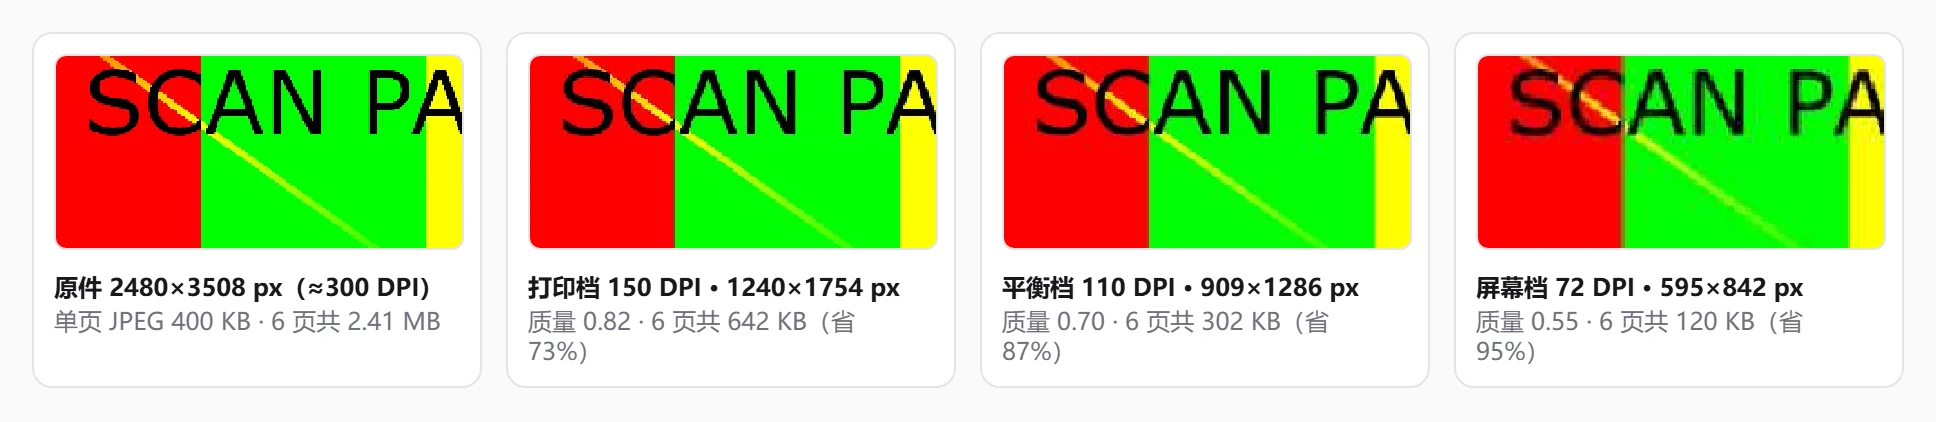
A six-page scan whose pages are 2480×3508 px JPEGs (A4 at 300 DPI), 2.41 MB in total. The three presets, measured:
For contrast, a 12-page contract of vector text only (11.7 KB) becomes 1.65 MB after the Balanced preset — every page turns into an image of about 137 KB, and the text can no longer be selected.
The same area enlarged, in the original and under the three presets. The test page is a synthetic pattern; detail loss on a real scan is softer than this.
How it works
What “compression” means here
A PDF is already a compressed format: text is described by font outlines, and images inside it are usually JPEG or Flate compressed. “PDF compression” can mean three completely different things in different tools:
Lossless reorganisation: dropping unreferenced objects, merging duplicate resources, enabling object streams. The size usually moves by a few percent.
Structure-preserving lossy work: downsampling and re-encoding only the image objects in the file, leaving text and vectors alone. This is what professional layout software and Ghostscript do; it works well and is complex to build.
Whole-page rasterising: rendering each page to an image and rebuilding the file. Simple to implement and best for scans, but everything on the page becomes pixels.
This tool takes route 3. Understanding that is enough to predict which files it helps and which it makes worse.
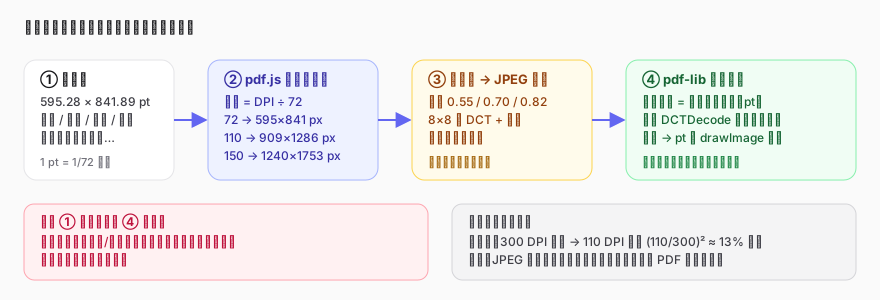
Every page goes through rendering, JPEG encoding and rebuilding; the size comes from resampling and quantisation, and the price is the text layer.
How a page becomes pixels
PDF measures page size in points (pt), where 1 pt = 1/72 inch, and A4 is 595.28 × 841.89 pt. To render, the tool draws the page onto a canvas with pdf.js at a scale of DPI ÷ 72:
72 DPI → scale 1.0 → 595 × 841 pixels
110 DPI → scale 1.53 → 909 × 1286 pixels
150 DPI → scale 2.08 → 1240 × 1753 pixels
That step is resampling: if the original scan was 300 DPI, outputting at 110 DPI throws away about 87% of the pixels ((110/300)² ≈ 0.13). Fewer pixels means less data for the JPEG encoder, which is the first source of the smaller size — and it is irreversible.
During rendering every element on the page — text, vector art, images, annotation appearance — is composited into that one bitmap, with the background filled white (JPEG has no transparency).
What the JPEG quality setting controls
The bitmap then goes through the browser's JPEG encoder, with a quality value (0–1) coming from the canvas toBlob() interface. JPEG cuts the image into 8×8 blocks and, after a discrete cosine transform, discards high-frequency detail according to a quantisation table: the lower the quality, the coarser the quantisation steps, the less high frequency survives, the smaller the file, and the more visible the “ringing” and blocky artefacts near edges.
The three quality values, 0.55 / 0.70 / 0.82, are tuned for scanned text that stays readable: below 0.5 the strokes pick up obvious noise, and above 0.85 the size grows fast for very little visible gain. The encoding details — whether chroma subsampling happens, which quantisation table is used — are up to the browser, so the same preset can produce sizes 10–20% apart in different browsers.
Why a text-heavy PDF grows
A page of vector text costs this much inside a PDF: the font, embedded once (tens of KB, shared by the whole document), plus a few bytes of positioning instructions per character. A densely set A4 page may be only 2–5 KB.
That same page as an image at 110 DPI is 1.17 megapixels. Text edges are exactly the high-frequency content JPEG is worst at, and even at quality 0.7 it takes 100–150 KB to encode black-on-white edges respectably. So a 12-page contract goes from 11.7 KB to 1.65 MB, more than a hundredfold. This is not a bug but a property of the method: it only pays off when each page of the original was already a bigger image.
What the rebuilt file looks like
The output is a brand-new PDF: one empty page per original page, of the same visual size, covered by a full-page JPEG (an image object using the DCTDecode filter in PDF terms). The fonts, vector art, text layer, bookmarks, forms, links and metadata of the original do not enter the new file. Blank pages inserted in the workbench stay as vector blank pages and are not rasterised; blank pages that were already in a scan are rendered like any other page.
Because the new file is pure imagery, any PDF reader opens it, so compatibility is excellent; but a search finds nothing, and a screen reader gets no text at all.
Advanced options
Delete pages before compressing: remove blank and irrelevant pages in the middle area so they take up no space; especially effective on the blank backs of duplex scans.
A different route when the text layer matters: if a file is mostly text with a few large images, rasterising is poor value. Pull the images out with “PDF Extract Images”, shrink them with “Image Compress” and lay the document out again — or accept it as it is, since text-based PDFs are usually small already.
Extract the text, then compress: to squeeze a scan hard while keeping the words, save the selectable text with “PDF Extract Text” first and archive the two files together.
Match the preset to the destination: phone reading only → Screen; day-to-day digital archive → Balanced; may be printed → Print. 150 DPI already prints A4 body text clearly, though small footnotes get slightly soft.
Combine with “N-up”: compress handouts at Screen first, then lay them out two pages per sheet with “PDF N-up” for the smallest printable handout.
Compress huge files in segments: a several-hundred-page scan uses a lot of memory in one pass; split it with “PDF Split”, compress the parts and merge them again.
Scope and limitations
Input
PDF; one file at a time, the one currently selected in the list on the left
Encrypted files
remove the password in “PDF Unlock” first
Presets
Screen (72 DPI / quality 0.55), Balanced (110 DPI / 0.70), Print (150 DPI / 0.82); the parameters are fixed, with no custom DPI or quality
Output
a new PDF with one JPEG covering each page; page size and orientation follow the current arrangement; blank pages inserted in the workbench stay vector
Text
text in the output cannot be selected, searched or copied, and a screen reader cannot read it
Where the effect stops
scans and photo-heavy PDFs typically save 70%–95%; a vector text PDF comes out larger than the original, with no “smaller” tag in the file name
Not preserved
the text layer, fonts, vector art, bookmarks, links, forms, the editability of annotations, metadata and digital signatures
File size
no hard limit; above 200 MB the tool warns that it will be slow; the bitmap for each page is held in memory, and a 150 DPI A4 bitmap is about 8.7 MB uncompressed, so a phone can run out of memory on a long document
What it does not do
it does not do structure-preserving “images only” compression, lossless reorganisation or OCR
Common pitfalls
“Text should still be selectable after compressing”: it is not. After rasterising, the text is only pixels. If you need selectable text, keep the original or extract the text first.
“Every PDF gets smaller after compression”: a text-based PDF gets bigger, sometimes dozens of times bigger. Whether the file name carries a “smaller” tag tells you if it paid off this time.
“Print preset = print quality”: 150 DPI is enough to read body text, but it does not reach the 300 DPI that printing usually asks for; for high-quality print, keep the original.
“Compressing several times makes it smaller”: a second pass re-renders and re-encodes a page that is already JPEG, so the size barely moves while the loss compounds. Pick the right preset once.
“Compression = optimisation”: this tool does not strip redundant objects or repair structure; if a file will not open, use “PDF Repair”.
Typical use cases
Emailing a contract scanned on a phone
A 20-page contract exported by a scanning app is 40 MB and exceeds the attachment limit. Balanced brings it to around 5–6 MB with no visible difference on screen; if the recipient needs to print it, the Print preset lands at about 12 MB, still inside most mailbox limits.
Archiving expense receipts
Dozens of photographed invoices turned into a PDF only need to be kept on file. Screen squeezes it to around 5% of the original while the text stays legible.
Meeting a submission size limit
An online application system caps attachments at 5 MB and a scanned degree certificate is 18 MB. Choose Balanced and, if that is still too big, try Screen; then check the saving in the file name.
Distributing handouts
A teacher sends scanned handouts to a class group and most students read them on a phone. Screen compresses them so they load fast and use less data; anyone who needs to print can ask for the original.
FAQ
Why did the file get bigger after compressing?
Because the original was mostly vector text and therefore already small, and rasterising turns each page into a one-to-two-hundred-KB image. Such a file does not need compressing; if the size really has to come down, the problem is usually a few large embedded images, so check with “PDF Extract Images”.
How do I choose between the three presets?
Decide the destination first: on-screen only → Screen; unsure → Balanced; may be printed → Print. Sizes run roughly 1 : 2.5 : 5 across the three, with sharpness rising in step.
Does compression change the page size or orientation?
No. Every page of the new file matches the original (including any rotation you applied in the workbench); only the content has become an image.
Can I compress only a few pages?
At the moment compression applies to every page of the current file. Split out the part you want with “PDF Split”, compress it, then merge it back with “PDF Merge”.
Can the text be turned back into selectable text afterwards?
Not directly. Rasterising is irreversible. If you need the words, you have to run OCR on the compressed file, and the accuracy depends on the preset — 72 DPI from the Screen preset is usually too low for OCR.
What if it is very slow or the browser freezes?
Every page has to be rendered to a large bitmap and then encoded, which takes noticeable time on long documents and high-resolution originals, and more so on a phone. Split the file with “PDF Split” and process it in parts, or move to a desktop browser.
Privacy
Every step of compression — rendering pages with pdf.js, encoding JPEGs on the canvas, rebuilding the file with pdf-lib — happens in your browser, and the file is never uploaded to any server. The intermediate bitmaps exist only in memory and are released when the page is closed. It also works with no network connection.
References & further reading
ISO 32000-1:2008, PDF 1.7, §8.3.2.3 user space (the default unit of 1/72 inch) and §7.4.8 DCTDecode filter (how JPEG images are wrapped in a PDF): https://opensource.adobe.com/dcs/pdf/PDF32000_2008.pdf(访问日期:2026-09-08)
ITU-T Recommendation T.81 (1992), Digital compression and coding of continuous-tone still images (the JPEG standard, quantisation and DCT): https://www.w3.org/Graphics/JPEG/itu-t81.pdf(访问日期:2026-09-08)
Mozilla pdf.js — the getViewport({ scale }) semantics used to render a page to a canvas (scale = 1 corresponds to 72 DPI): https://mozilla.github.io/pdf.js/(访问日期:2026-09-08)